

How To Stop Condensation On Windows In Car
How to Repair Old Windows
Updated: Aug. 27, 2019
Don't replace casement windows—repair them
Learn how to fix common casement window problems. Free up a sticking window, replace a broken crank operator or sagging hinge, fifty-fifty replace an entire sash. Repairs are simple, and a lot cheaper than replacing the whole window.
Yous might likewise similar: TBD
Overview
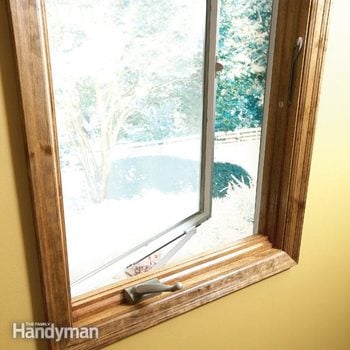
If you're thinking about replacing your casement windows because they're drafty, fogged up or just hard to open up, consider this: You can set most of the problems yourself for a fraction of the cost of new windows—and it won't accept you lot more than an 60 minutes or two per window.
In this story, we'll walk yous through the fixes for the near common casement window issues. (Casement windows are the type that swing like doors.) Y'all won't need any specialty tools, and the materials are bachelor from most window manufacturers or online window supply companies.
Although your windows may look different from the ones shown hither, the techniques for removing the sash and fixing problems are similar.
Effigy A: Casement Window Operation
When you plow the handle, the operator moves the crank arm and the split arm operator. The divide arm operator then opens the window sash. Casement window operators come in several styles. They may look complex, but they're easy to disconnect, remove and supplant.
Set a stripped crank handle
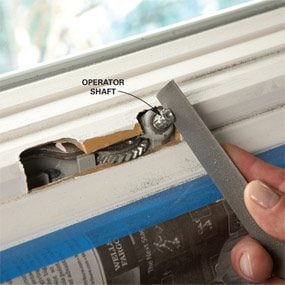
File the shaft
File a flat spot on the operator shaft, then insert a longer setscrew into the handle. The flat side lets the setscrew lock onto the shaft.

Window handle
Supervene upon the original setscrew with a longer ane.
If you turn your window handle and nothing happens, the gears on your handle, crank operator shaft or both are probably stripped. Take off the handle and look for signs of wear. If the teeth are worn, replace the handle (available from manufacturers, window dealers, or search online for "window replacement parts"). If the shaft is worn, yous can replace the whole operator (see the next set up). Only hither's a home remedy to try start.
Get-go past backing out the setscrew to remove the handle (some newer handles don't have setscrews and simply pull off—and this prepare won't work). If yous have a folding handle, mark where the setscrew is on the operator shaft when the window is closed and the handle is folded up. Remove the handle and file the shaft and so the setscrew tin lock onto the shaft (photo). The metal is tough; it'll take well-nigh fifteen minutes to become a apartment side. Or use a rotary tool with a grinder bit to speed upwardly the job. Vacuum the shavings out of the operator so they won't harm the moving parts.
Reattach the handle with a longer setscrew (sold at hardware stores). If y'all open and close the window a lot, this fix may not hold up in the long run.
Supplant a stubborn crank operator
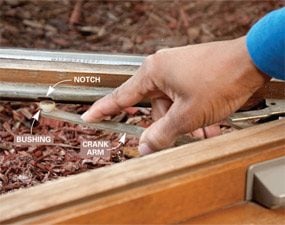
Photo 1: Popular out the creepo arm
Open the window until the crank arm bushing is aligned with the guide rail notch. Push down on the arm to pop the bushing out of the track.
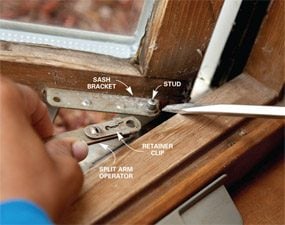
Photograph 2: Pry off carve up arm operator
Slide back the servant prune on the arm and pry the arm off the stud on the sash bracket with a screwdriver.
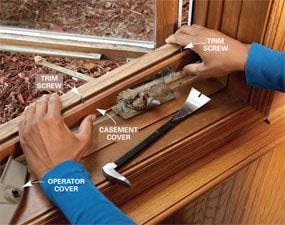
Photo 3: Remove creepo operator
Elevator off the casement cover to expose the crank operator. Remove the screws, take out the crank operator and supervene upon it.
If the splines on the crank operator shaft are worn or broken off, the gears don't turn easily or at all, and then information technology's fourth dimension to supercede the crank operator.
Don't worry if you tin't find the make, model or serial number of the crank operator. You only demand a picture. Snap a digital photo, email it to a window replacement parts visitor and the visitor will sell y'all a new i. Or mail the visitor a impress photo. Y'all can also expect at online catalogs at the replacement parts companies to find an operator that matches yours.
To replace the operator, first take the crank arm off the sash. Most crank arms slip out of a notch on the guide rails on the sash (Photograph ane). Others are pried off with a flathead screwdriver, or a channel is unscrewed from along the lesser of the sash. If the operator as well contains a dissever arm operator, unhook that, also (Photo 2).
Slide or pry off the operator embrace. If you accept a removable cover, cut along the casement comprehend with a utility knife to slice through any paint or stain that seals information technology on the window jamb. Remove the trim screws along the top of the casement embrace. Gently pry the cover loose (Photograph 3). Be careful—the cover can easily pause! Unscrew the creepo operator. Set the new operator in place, aligning information technology with the existing screw holes, and spiral it to the jamb. If the cover isn't removable, creepo operator screws volition be attainable on the exterior of the window.
Set a sticking window
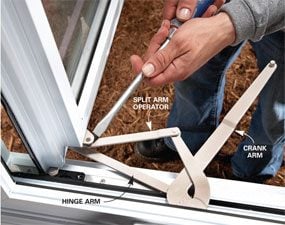
Photo 1: Disconnect the arms
Open up the sash and disconnect the crank arm. Pry the carve up arm operator off the top and the bottom of the sash with a screwdriver (the hinge artillery easily pop off).
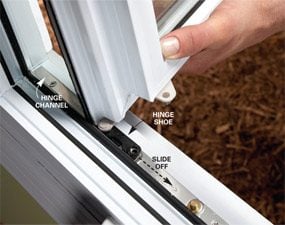
Photo 2: Slide the hinge shoe out
Slide the hinge shoes out of the hinge channels at the top and bottom of the window to remove the sash.
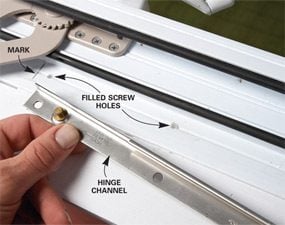
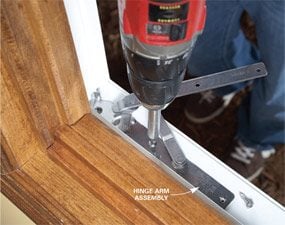
Photo 3: Drill new holes
Set the hinge channel in place, slightly over from its former location. Drill new holes, then screw information technology to the jamb.
If you accept a window that drags confronting the frame when you open up information technology, close the window and examine it from the exterior. The sash should fit squarely and be centered in the frame. If not, you can adjust the position of the sash by slightly moving the swivel aqueduct. (If the window is centered and square simply withal drags, see the next fix.)
You tin can move the channel at the peak or the bottom of the window, depending on where the sash is dragging (only don't movement both channels). Start by taking out the sash (Photos 1 and 2). If the hinge arm is screwed to the sash, see 'Replace a fogged sash' below.
Mark the hinge channel location on the frame, and so unscrew the aqueduct. Fill the screw holes with epoxy (for vinyl windows) or woods filler (for forest windows). Filling the holes keeps the screws from realigning with their old locations when you reinstall the channel. Scrape the filled holes smooth before the epoxy sets. Place the channel back on the jamb, almost 1/8 in. over from the mark (move the channel away from the side of the sash that's dragging), drill ane/8-in. airplane pilot holes and then reinstall it (Photo three).
Supervene upon a sagging hinge
Fasten the new hinge
Align the new hinge arm with the screw holes and fasten it into place. If the screw holes are stripped out, fill them with toothpicks dipped in wood glue, permit the glue dry, then cut the toothpicks flush.
Over time, hinge arms that support heavy windows tin outset to sag, causing the sash to striking the frame in the lower corner that's opposite the swivel. Offset brand sure the window sash is foursquare and centered in the window opening. If it'due south not, see the previous set up. To eliminate drag in a window that fits squarely, replace the swivel arms at the top and the bottom of the window. You lot can buy the hinges at window hardware supply stores.
Remove the sash from the window. The swivel artillery are located near a corner or in the middle of the window frame. Unscrew the hinge arms from the window, so install the new ones in the same locations.
Seal a drafty window: Weather stripping casement windows
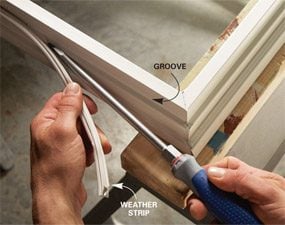
Remove weather stripping
Work the old weather strip out of the groove gently to avoid tearing it and leaving the spline stuck in the groove.
Atmospheric condition stripping ofttimes becomes loose, worn or distorted when the sash drags or when the strip gets glutinous and attaches itself to the frame, then pulls loose when the sash is opened. Windows accept weather strip on the sash, frame or both. Regardless of its location, the steps for removing and replacing it are the same. Atmospheric condition stripping is available from your window manufacturer. The window make and drinking glass manufacturer date are etched in the corner of the glass or in the aluminum spacer between the drinking glass panes. You'll also demand the height and width of your sash (take these measurements yourself).
If the weather strip is in skillful shape and loose in merely a few places, like the corners, utilise a dab of polyurethane sealant (sold at hardware stores) to the groove and press the weather strip into place. Otherwise, replace the entire conditions strip. First remove the sash and gear up it on a work surface so you tin admission all four sides. If the weather strip is one continuous piece, cut information technology apart at the corners with a utility knife.
Starting at a corner, pull the weather strip loose from the sash. If the spline tears off and remains stuck in the groove, make a hook from stiff wire to dig information technology out.
Work the new weather strip into the groove, starting at a corner. You'll hear information technology click as the strip slides into the groove.
If the window is stuck close, it's likely that the weather strip is sticking. Subsequently you muscle it open, spray silicone lubricant on a rag and wipe it on the weather stripping. Don't use oily lubricants; they attract dust.
Replace a fogged sash
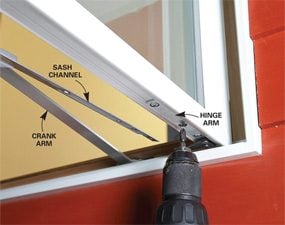
Photo one: Remove the sash
Accept off the sash by removing the screws in the channel and the swivel arms. And then slide the sash off the hinge arms.
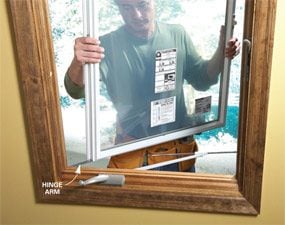
Photo 2: Attach the new sash
Align the sash lip with the hinge arms, then slide the sash onto the hinges. Insert screws to fasten the sash in place.
If y'all have cleaved glass or fogging (condensation betwixt the glass panes), you'll take to supplant the glass or the unabridged sash. If the sash is in good shape (non warped or cracked), y'all can sometimes replace but the glass. Phone call your window manufacturer to see whether drinking glass replacement is an option and if a fogged window is covered under your warranty. Yous'll need the information that'southward etched into the corner of the glass and the sash dimensions.
Contact a glass repair specialist to accept but the glass replaced (look under "Glass Repair" in the yellow pages or search online). Or y'all tin replace the sash yourself and salve some of the cost. Lodge it through the manufacturer.
To replace the sash, first remove the old one. You take this sash off by removing the hinge screws (Photograph 1). For sashes that slide out, meet 'Fix a sticking window' to a higher place. Remove whatsoever hardware from the damaged sash and install it on the new sash (this sash doesn't require any hardware).
Install the new sash by sliding it onto the hinge arms, so screw it to the hinges (Photo two).
Required Tools for this Projection
Take the necessary tools for this DIY projection lined upwards earlier you start—you'll salvage time and frustration.
Required Materials for this Project
Avoid last-minute shopping trips by having all your materials ready ahead of time. Here's a listing.
Originally Published: August 27, 2019
Source: https://www.familyhandyman.com/project/how-to-repair-old-windows/
Posted by: chappelleportelon.blogspot.com
0 Response to "How To Stop Condensation On Windows In Car"
Post a Comment